Godot Racing Game Tutorial
-
We are going to make this racing game. Click the link to play it now.
-
This game uses Godot’s physics engine so that all the objects in the game have real physics. Notice what happens when you hit the cones. (Unfortunately Godot does not have correct car physics built-in, so the cars control like real life boats or spaceships, but it’s still fun for a game.)
-
You can play on mobile using the touchscreen buttons.
-
You can play with cursors keys and hit ‘space’ to drift. (You can also play with a controller.)
-
You can hit ‘C’ key to rotate the camera.
-
There is a timer and your best time is (temporarily) saved.
Getting started
Download this stater project, unzip and import it into Godot.
Run the game. Use cursor keys to control. Press up to get car on screen.
What nodes do we already have? Let’s look at them:
- background - Tilemap of grass tiles
- track - Tilemap of racetrack
- player - RigidBody2D that gives us the car’s physics and collisions
- Sprite - image of the car
- CollisionShape2D - required for the physics and collisions to work
- objects - some other sprites to decorate the racetrack
- controls - the on-screen control buttons
There is a little bit of code in player.gd but notice how the physics engine already
gives us most of the behaviour required for the game.
Camera
Add a child node of type Camera2D to player.
In the Inspector, enable Current.
Set the Process mode to Physics.
Try changing the Zoom x and y. What happens?
Try enabling Smoothing. What happens?
Try enabling Rotating. What happens?
If you would like the camera to zoom in and out, replace the camera() function in player.gd
with this code:
func camera():
	var scalefactor = 1.5 + linear_velocity.length()/1000
	$Camera2D.zoom = lerp($Camera2D.zoom, Vector2(scalefactor, scalefactor), 0.01)
Car Sprite
The player node already has a Sprite setup so we don’t need to add one, but we are going
to modify it.
Click on the Sprite node under player. In the Inspector you can see the Texture image.
Choose a new image from Cars or Motorcycles in the FileSystem and drag it over the Texture
in the inspector. (Alternatively you could drag it into the scene to create a new Sprite node.)
Car CollisionShape
The car already has a CollisionShape2D but you might need to modify it if you
changed the sprite.
Engine sound
Add an AudioStreamPlayer node as a child node of player. Rename it engine.
In the Inspector find the empty Stream. In the FileSystem find sounds/engine-loop-1-nomralized.wav.
Drag this file on to the Stream.
Enable Autoplay in the inspector.
Replace the function sound() in player.gd with this code:
func sound():
	$engine.pitch_scale = linear_velocity.length()/1000 + 0.1
Track Tilemap
Click on the track node. Edit the tilemap to create your race track. You can come back to this and
add more later.
I have only made collision shapes for the red/white barriers. The other barriers won’t work (unless
you edit racing_tileset.tres and create your own shapes.)
Cones
Click on objects node. In the FileSystem find the cone.tscn file. Drag this file into the scene to place a cone.
What happens if you change Mass of the cone in the Inspector?
Other map objects
In the FileSystem folder Objects you can find some decorative images.
Click the objects node and then drag them into the scene to create sprites.
Crash sound effect
Add an AudioStreamPlayer node as a child node of player. Rename it crash.
In the Inspector find the empty Stream. In the FileSystem find sounds/qubodup-crash.ogg.
Drag this file on to the Stream.
Increase the Volume a bit. Decrease the Pitch. (Click Playing to hear it.)
Click on the player node. Click on Node on the top right to view the signals.
Double click signal body_entered(body:Node) and press Connect to connect it to the player script.
Replace the function with this one:
func _on_player_body_entered(body):
	$crash.play()
HUD
Create a CanvasLayer as a child node of racetrack and rename it HUD.
Add child nodes to it:
Labelnamedtime.- In Inspector in the
Textbox type: TIME - Drag the label to position it.
- In Inspector in the
Labelnamedbest.- In Inspector in the
Textbox type: BEST - Drag the label to position it.
- In Inspector in the
For both labels, in the Inspector find the Custom Font and drag in the
big font from the FileSystem (interface/fonts/kenvector_futre_32.tres)
Right click on the root node racetrack and select ‘Attach Script’. Press Create.
Delete any code in the script, and add this code:
extends Node2D

var time = 0
var best_time = 999

func _process(delta):
	time += delta
	$HUD/time.text = "TIME: " + str(time).pad_zeros(3).left(6)
The timer should now work, but it doesn’t know when you finish a lap.
Finishing line - checkpoint
Add an Area2D child node to racetrack. Name it checkpoint.
In Node Signals, Connect the body_entered(body: Node) signal (double click it) to the racetrack script (press connect)
Replace the generated function with this one:
func _on_checkpoint_body_entered(body):
	if body.name == 'player':
		if(time < best_time):
			best_time = time
		$HUD/best.text = "BEST: " + str(best_time).pad_zeros(3).left(6)
		time = 0
Add a CollisionShape2D child node to checkpoint node.
In the Inspector, set its Shape to New RectangleShape2D. Drag the dots to make the rectangle bigger.
Position the node over the finish line.
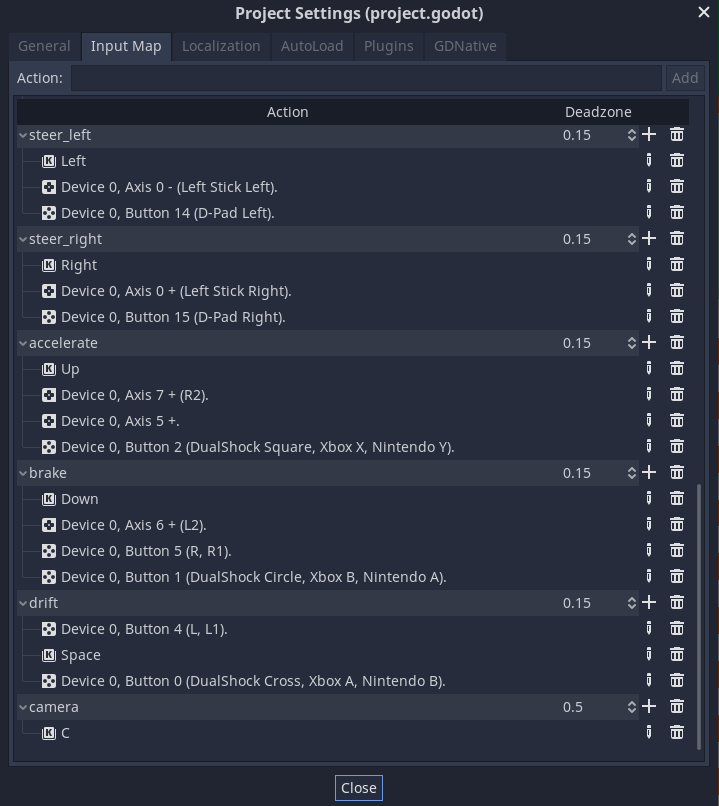
Analogue controls
In Project Settings set up controls like this:
Replace the input() function in player.gd with this:
func input():
	var steering = Input.get_action_strength("steer_right") - Input.get_action_strength("steer_left")
	if Input.is_action_pressed("drift"):
		apply_torque_impulse(DRIFT_STEERING * steering)
		linear_damp = DRIFT_FRICTION
		$skid.stream_paused = false
		doSkidmark()
	else:
		var acceleration = (Input.get_action_strength("accelerate") - Input.get_action_strength("brake")) * Vector2.UP * ACCELERATION
		apply_central_impulse(acceleration.rotated(rotation))
		apply_torque_impulse(STEERING * steering )
		linear_damp = FRICTION
		$skid.stream_paused = true
Notice we already have some exported variables at the top of the program. Click on the player node
and try changing the values of these variables in the Inspector.
Skid marks
We already have a skidmark.tscn scene that contains a skidmark. We also already have the sound
effect added to the player.
Create a Node2d as a child of racetrack and name it skidmarks. This will store our skidmark objects.
Try to position it in between the track node and the player node (since that is where skidmarks should appear.)
Replace the doSkidmark() function in player.gd with this:
func doSkidmark():
	var skidmark = Skidmark.instance()
	skidmark.position = position
	skidmark.rotation = rotation
	get_node("/root/racetrack/skidmarks").add_child(skidmark)
Challenges
- 2 players
- Computer controlled cars
- High score table (online)
- Title screen
- Add friends’ tracks